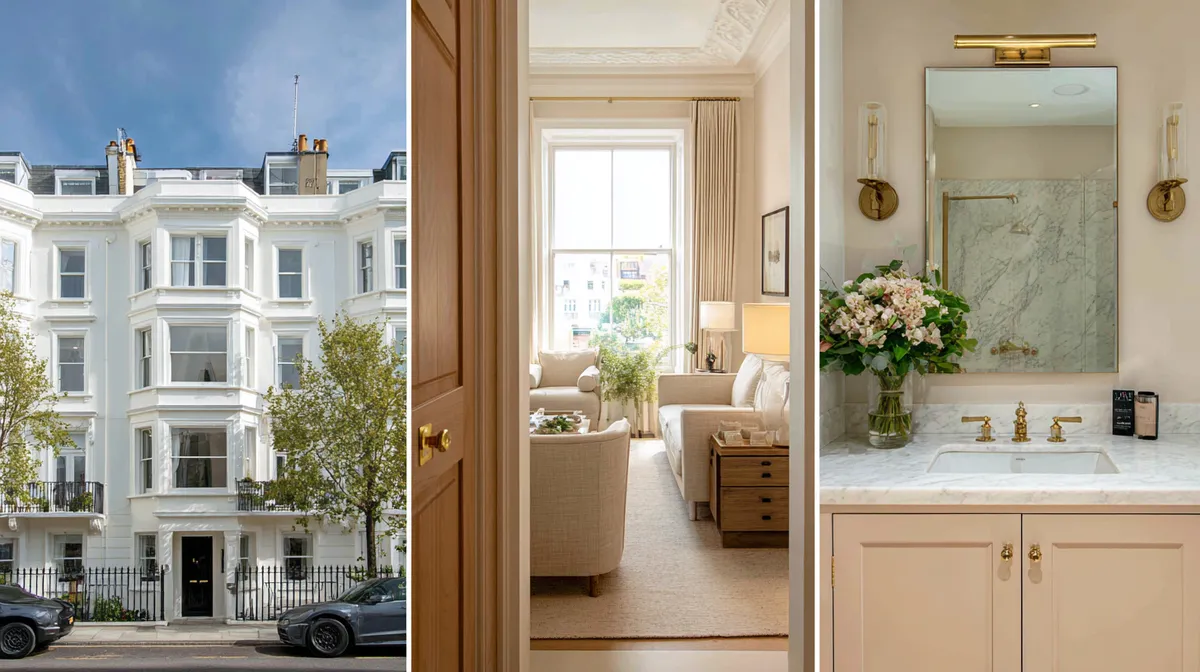
St George's Square, Pimlico
An apartment refurbishment with marble bathrooms, integrated mirror cabinets and brass detailing.
Bathrooms by Hampstead Renovations
En-suites, family bathrooms, wet rooms and cloakrooms across North, Central and South West London, set out from the measured room around drainage falls, tanking and wall build-up.
Also available: start a bathroom brief or open the full enquiry page.
Ross Alinari, Senior Building Surveyor and Construction Director. Hampstead Renovations Ltd, company number 16838595. £5M public liability, £10M employers' liability and contractors' all risks cover.

Book a feasibility visit
We reply within one working day, Monday to Friday, 8am to 6pm.
Or call 020 7101 3168
“We have worked with Ross and his company many times. They are extremely professional and hardworking individuals who can work under any circumstances. There was no variation to the works.”
“I would like to thank Ross and his team for their consistent commitment to quality and their unerring reliability. They delivered our property to specification and on time, proving to be an extremely effective, experienced, and proactive contractor.”
Updated
A bathroom renovation in London covers layout, controlled strip-out, plumbing first-fix, waterproofing tanking, drainage falls, ventilation, tiling and fitting for en-suites, family bathrooms, wet rooms and cloakrooms under one contract. Projects typically fall within £9,000 to £18,000 plus VAT, set by written quotation from a feasibility visit and measured survey. Handover includes a 12-month aftercare/defects period.
We design and build the bathroom under one contract: the layout, waterproofing, drainage, ventilation, tiling and fitting. That covers one en-suite or every bathroom in the home.
The room is set out from a measured survey. A wet room or a shower is tanked, and the floor build-up is checked before the tray or the drain is fixed.
Moving the WC, shower or bath away from the soil stack changes the pipe runs. In a flat, the lease and the home below are part of that decision.
In-house architects, designers and structural engineers plan the room. A written quotation follows the agreed specification.
Find your bathroom renovation guide in North and North West London, Central London or West and South West London.
Completed bathrooms within published Hampstead Renovations London projects.
An apartment refurbishment with marble bathrooms, integrated mirror cabinets and brass detailing.
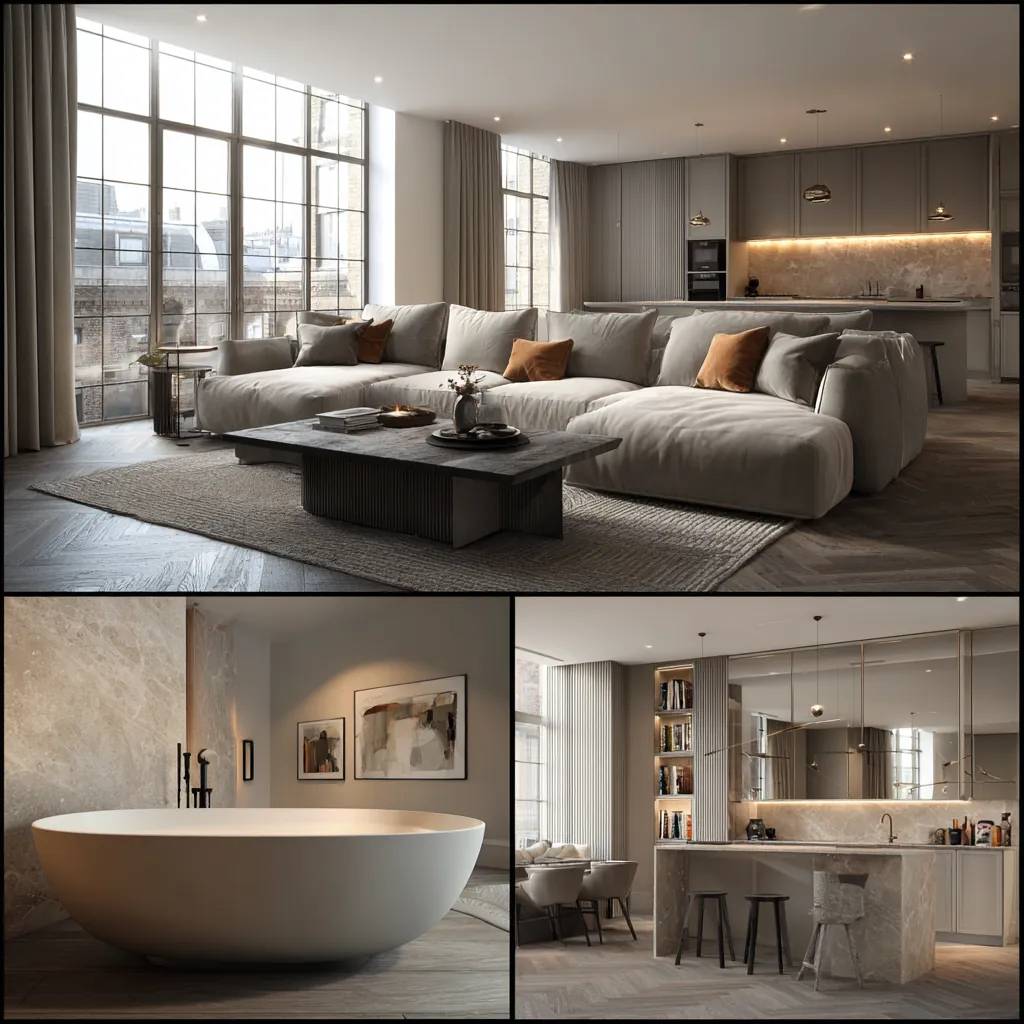
An apartment in a Georgian townhouse, with book-matched marble bathrooms and bespoke joinery.
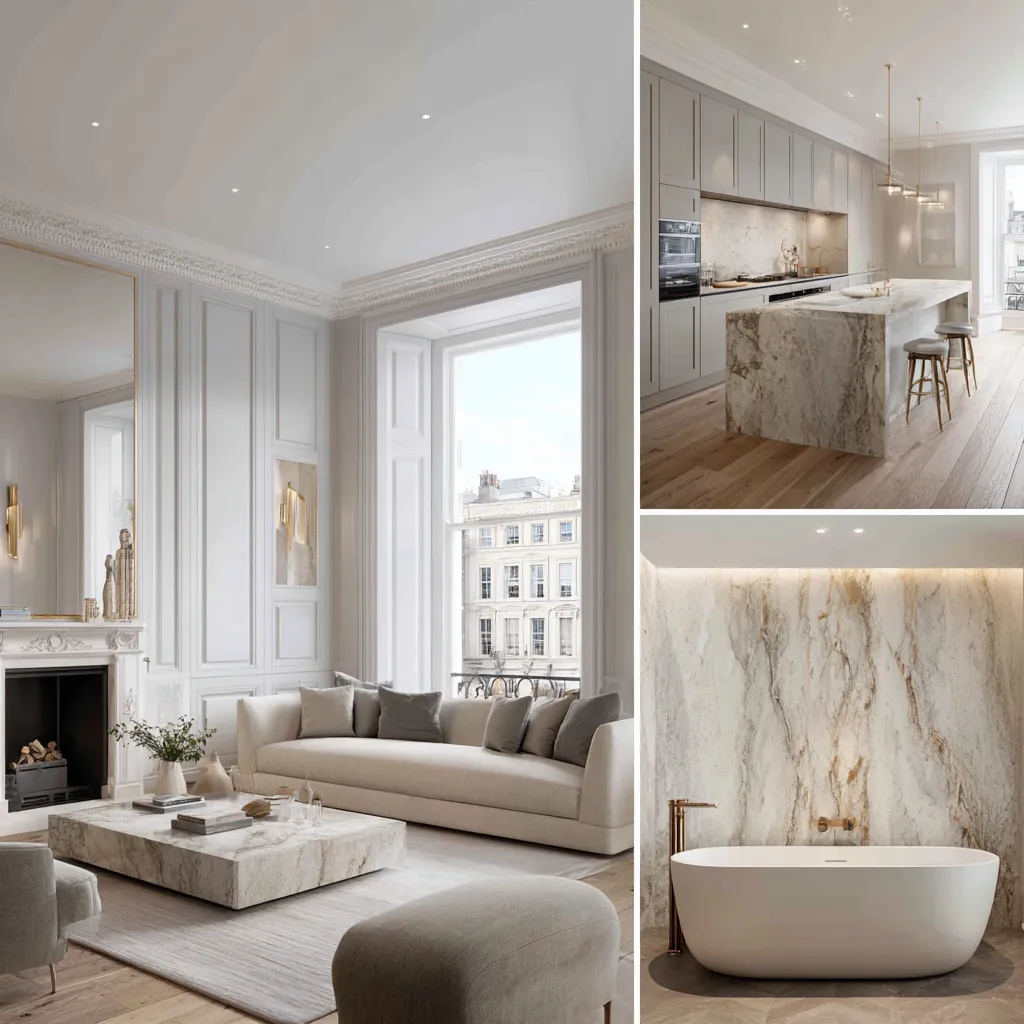
An apartment refurbishment with natural stone bathrooms and concealed thermostatic brassware.
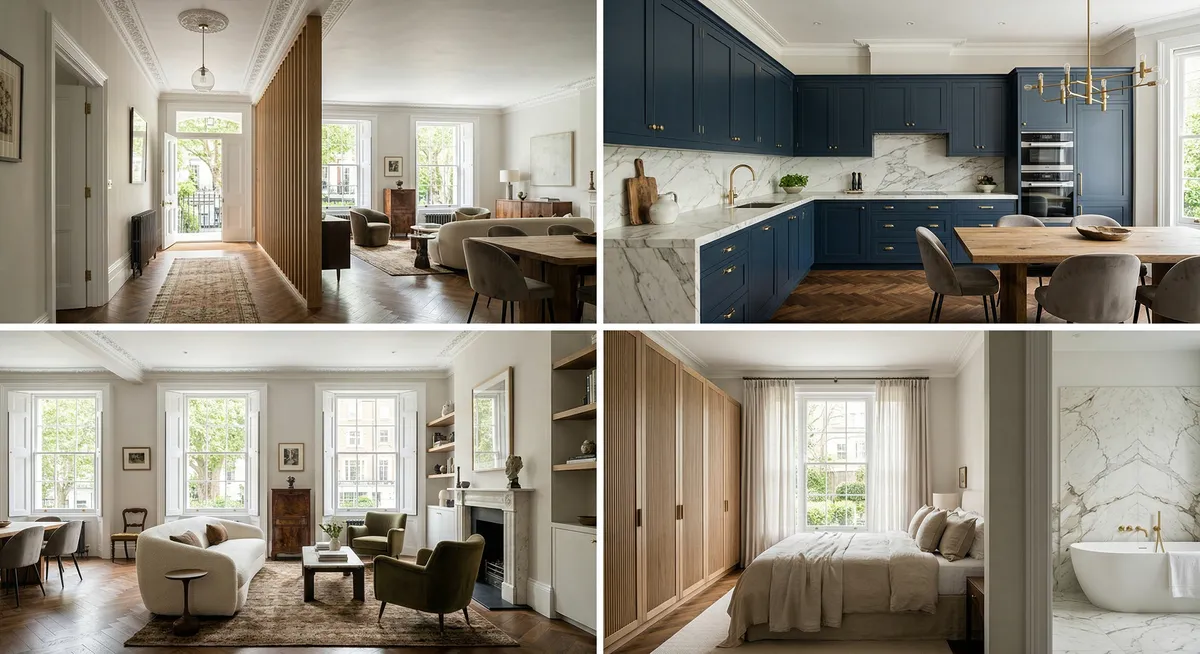
A full apartment renovation taking in the bathrooms, custom joinery and fitted kitchen.
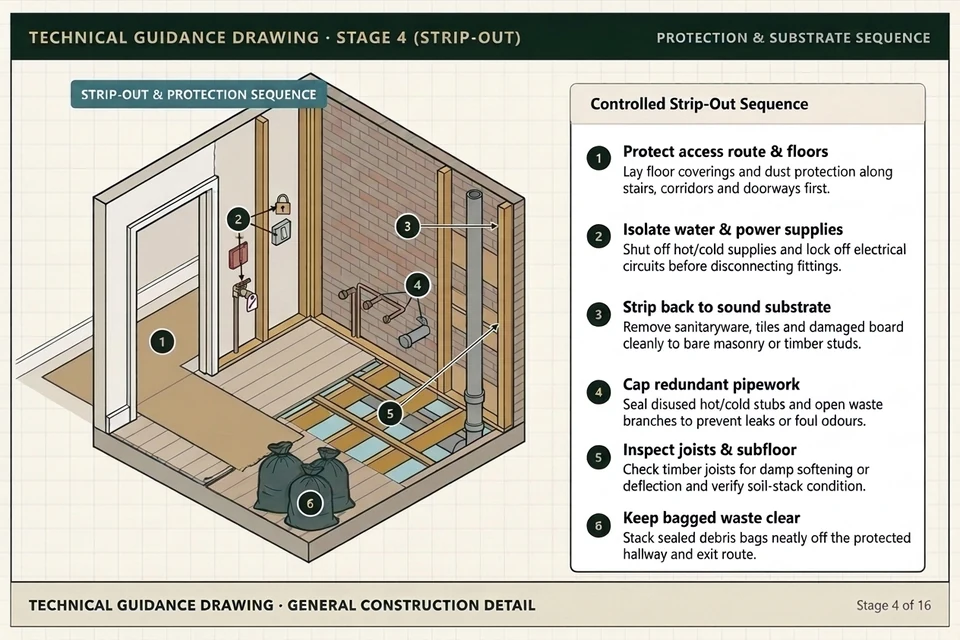
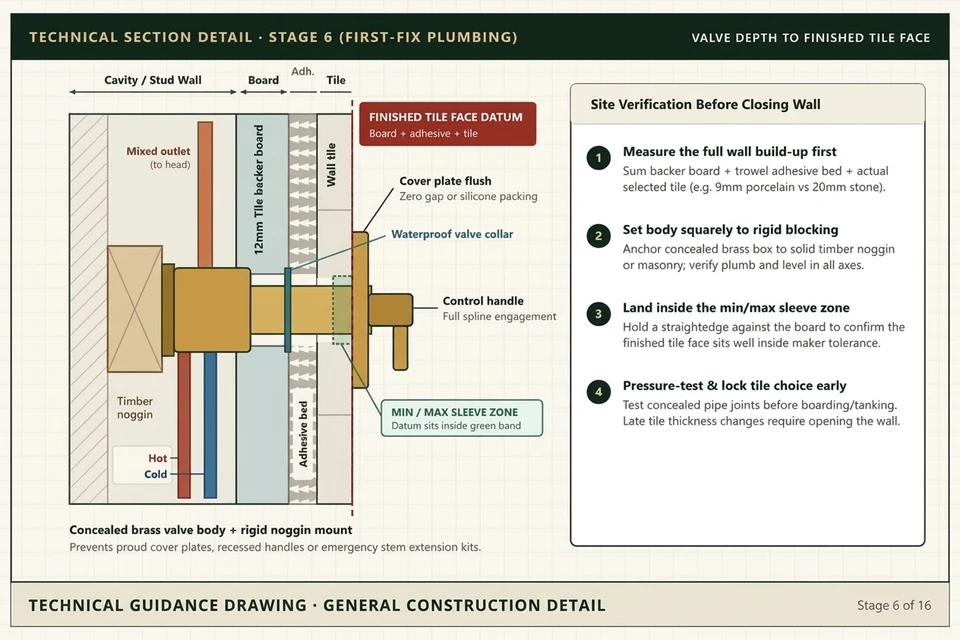
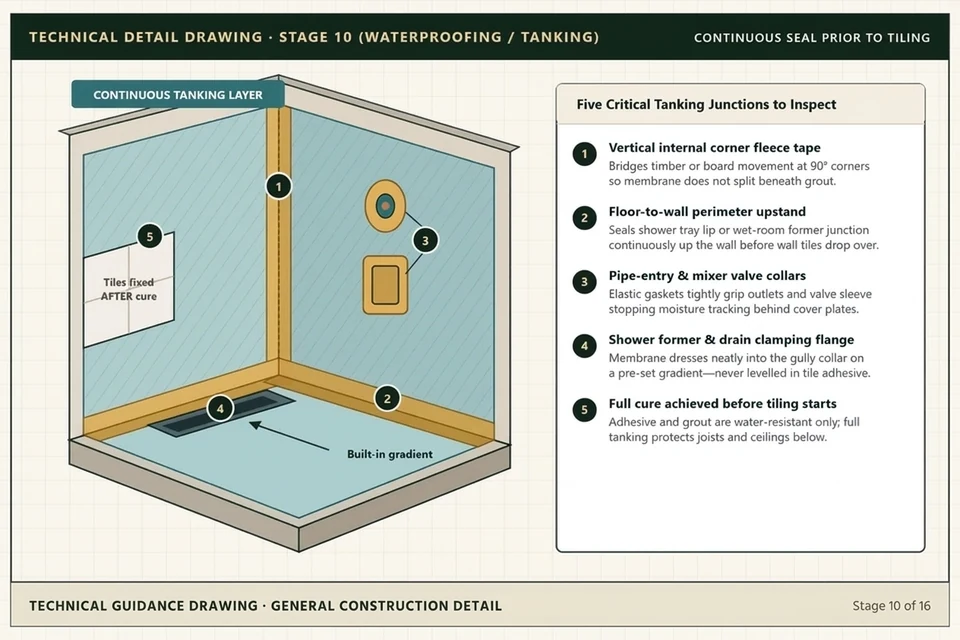
Stages 4, 6 and 10 of our 16-stage process
Most bathroom faults are buried behind tiles long before the second-fix brassware goes on: missing waterproofing around a tray, poorly anchored shower valves, or pipe falls stretched beyond what the soil stack allows. These three critical stages from our 16-stage sequence (Stages 4, 6 and 10) set out how the hidden structure is protected, checked and waterproofed before tiling begins.
Read Stage 4 in the 16-stage guide · Continue to Stage 5: Inspect and repair the structure
Read Stage 6 in the 16-stage guide · Continue to Stage 7: Coordinate electrics, heating and extraction
Read Stage 10 in the 16-stage guide · Continue to Stage 11: Set out and lay the tiles
Stages 4, 6 and 10 are three key checkpoints in our 16-stage bathroom sequence. Read every step from survey to handover in our 16-stage bathroom renovation guide.
Book a bathroom consultationThe appointment ends with a 12-month aftercare/defects period.
The cost moves with moving the WC, shower or bath away from the soil stack, tanking and the floor build-up, the strength of the floor, the extract route, sanitaryware, brassware and tiles, and the lease where the bathroom is in a flat.
| Typical scope | What changes the cost | What we need to quote |
|---|---|---|
| CloakroomWC and basin layout planned around the existing soil stack, controlled strip-out, first-fix plumbing, ventilation, tiling and fitting. | Distance and fall to the soil stack (including adapting older cast-iron pipework), wall build-up for a wall-hung WC frame or concealed cistern, extract duct route, tile and sanitaryware specification, and flat lease or listed building constraints where applicable. | Feasibility visit, measured room survey checking stack position and extract route, confirmation of who supplies sanitaryware, brassware and tiles, and any flat lease or listing details. |
| En-suiteWalk-in shower, wall-hung WC and basin beside a bedroom, including strip-out, plumbing first-fix, concealed shower valve setting, wet-zone tanking, ventilation, tiling and fitting. | Relocating the WC or shower away from the soil stack, wall build-up for concealed shower valves, niches or a pocket door, wet-zone tanking and tray preparation, extract routing to an external wall or approved duct, porcelain versus natural stone tiling, and flat Licence to Alter or access rules. | Feasibility visit, measured survey of room dimensions, joists, stack and ventilation route, confirmed brassware and tile thicknesses before first fix, supply responsibilities, and lease extract if in a flat. |
| Family bathroomFull strip-out and rebuild accommodating a bath, shower, WC and basin with waterproofing, drainage falls, ventilation, tiling, heating and second-fix fitting. | Moving the bath, shower or WC relative to the soil stack, floor joist stiffness and strengthening where needed for heavy fittings or stone, concealed frames and heated towel rail pipework, tile format and natural stone sealing, extract routing, and flat lease, listed consent or hallway access restrictions. | Feasibility visit, measured survey checking floor joists, ceiling height, drainage falls and stack position, sanitaryware, brassware and tile selections (plus who supplies them), whether another WC stays usable, and any lease or listing details. |
| Wet roomTray-free shower room with a floor laid to fall into a linear drain or central gully, continuous floor-to-wall waterproofing tanking, slip-resistant tiling and drainage connection. | Floor structure, joist depth and strengthening to prevent tile cracking on upper floors, screed or wet-room former gradients to a linear drain or central gully, full floor and wall tanking membrane with corner tapes, pipe collars and drain flange, slip-resistant stone or porcelain choice, ventilation sizing, and flat lease approval above another home. | Feasibility visit and measured survey confirming floor build-up, joist depth and achievable drain fall, linear drain or gully preference, confirmed slip-resistant tiles, concealed valve and rail-blocking positions, and freeholder Licence to Alter or listed details where applicable. |
Typical London bathroom renovations fall within £9,000 to £18,000 plus VAT (written quotation from a feasibility visit and measured survey) — outline your project in our cost calculator.
The quotation states the VAT treatment for the agreed scope. A written quotation follows the feasibility visit and the agreed scope and specification.
The layout, the waterproofing, the drainage, the ventilation, the sanitaryware, the tiles and the finishes. The survey checks the stack, the falls and the floor before the layout is fixed.
£9,000 to £18,000 plus VAT. The room size, how far the plumbing moves, a wet room, the tiles and sanitaryware, and access move the price inside that range. A written quotation follows a feasibility visit.
Often. A WC needs a connection to the soil stack with a workable fall, and a shower or bath needs a fall to its waste. The survey confirms what the stack and the floor allow before the layout is drawn.
A feasibility visit and a measured survey come first. Waterproofing, falls, ventilation and the fittings are agreed, you receive a written quotation, and the room is stripped out. First fix, tanking, tiling and the fittings follow, and handover includes a 12-month aftercare/defects period.
A room whose floor is waterproofed and drained to a floor-level gully, with no tray. The floor is laid to a fall, and the tanking is carried up the walls and around every pipe before the tiles go on. It is specified only where the floor build-up and the drain can do that job.
The drainage falls, the extract route, the lighting positions, the tile setting-out, the storage, and how a valve or a trap will be reached later. A niche, a pocket door or a wall-hung WC changes the wall build-up, so those choices are on the drawing before the old fittings come out.
Where a soil connection, a water supply and a floor that can carry the fittings can all be shown. In a loft the waste is usually boxed through a chase. In a flat the lease has to allow the new connection. The survey says whether that route exists before the room is promised.
Yes, where another WC and a water supply stay available. If this is the only bathroom, the days without it are agreed before the strip-out, including dust protection and the route the fitters will use.
We reply within one working day, Monday to Friday, 8am to 6pm.
Leave your name and phone number and we will call you back about your bathroom renovation.
Local constraints across London boroughs vary from leasehold licence-to-alter approvals in mansion blocks to Victorian joist spans and heritage conservation rules. Explore a starting selection below, followed by all 45 local guides.
For a new bathroom in a villa flat, look for a side or rear route for soil and vent pipes before fixing the layout.
For a lower-ground bathroom on Cavendish Road, check the level of the existing drain before choosing the WC position.
When adding an en-suite beside the family bathroom in a period terrace, decide which showers need to run together before sizing the hot-water supply.
On Boscastle Road, draw the proposed waste and vent routes on the rear wing so you can see which floors they pass.
In a West Heath Court mansion flat, trace where the bathroom waste joins the shared stack before choosing a new shower position.
Trace the waste and extract routes through the existing house before choosing a wet room or en-suite.
A new vent or outside pipe can bring the Suburb Trust into a bathroom refit. Mark each outlet on the drawing.
For a semi-basement bathroom near South End Green, establish the drain level before choosing a shower position.
Trace any staining around the existing bathroom back to its source. The joists, waste pipe and fan route can all affect where the shower will fit.
A shower under a loft slope needs standing height as well as a fall to the rear stack. Check both in section.
If a mansion-flat bathroom has no outside wall, establish how steam can reach an approved outlet.
In a divided Queen’s Avenue house, trace the shared stack before taking space from a bedroom for an en-suite.
In a Chalcot Crescent house, show the proposed fan outlet or soil pipe on the same drawings as the new en-suite.
Before moving the WC in a Queen’s Park terrace, measure the fall to the stack and mark where any new pipe would appear outside. See the four bathrooms in a double-fronted Queen’s Park house.
For a bathroom in a listed terrace, trace waste pipes and ventilation around the rooms and fabric to be retained.
Find the shared soil stack and the rooms below the proposed shower before setting the floor height.
In a mansion flat, locate the shared soil stack and measure the fall to it before moving the WC.
For a windowless bathroom in a shared block, check the fan route and soil stack before deciding where the shower can go.
In a listed village cottage, plot the waste route around surviving timbers before stripping out the bathroom.
For an internal bathroom in a mansion flat, find a workable ventilation route before agreeing the layout.
More bathroom renovation pages in North and North West London:
In a Hallfield Estate flat, work out how to ventilate the bathroom while keeping the original steel window pattern.
For a lower-ground bathroom on Chester Row, check how the room drains and whether the existing system protects it against backflow.
In a listed Goodge Place townhouse, record original partitions and floor levels before deciding which room can take a bath or shower.
In Hans Town, plan a bathroom fan outlet that leaves the fanlight above the door intact. Cadogan Square marble bathrooms.
In the listed terrace at 10–22 Lancaster Gate, trace the bathroom stack through the divided floors before proposing a new WC position.
On the Harley Street grid, show the waste and ventilation routes on the rear elevation as well as the bathroom plan.
Before relocating the basin or WC in a Mayfair apartment, mark which waste connections are private and which connect to a shared stack.
In a converted Cubitt terrace, follow the stack from the upper bathroom down to the basement before shifting the WC. Marble bathrooms at St George’s Square.
At St James’s Place, trace the soil stack through the terrace before deciding whether an upstairs bathroom can change position.
In a Matthew Parker Street conversion, locate the soil stack and find out who controls the shut-off valves before moving the WC.
More bathroom renovation pages in Central London:
Above a Church Street shop, trace the waste pipe and agree access for testing before lifting the bathroom floor.
Some Park Town terraces were built as flats. Establish which home lies below the proposed shower before deciding the floor build-up.
In a Sloane Stanley half-basement, measure the outlet level and trace a waste route that keeps new pipes away from the railed street frontage.
At Strand-on-the-Green, trace a bathroom extract route before cutting into a surviving sash or the river-facing brickwork.
In a converted Philbeach house, check the joist depth and the ceiling below before specifying a flush shower tray.
Trace the existing external soil pipe on a Moore Park house and record its material before deciding where to move the WC.
In a Holland Park half-basement, measure the drain level and check whether the proposed bathroom needs pumped drainage.
In a half-basement behind a Kensington lightwell, measure the floor level against the route to the drain before fixing the shower position.
On the lower-lying terrace at 68–110 Kew Green, measure the drain level before moving a ground-floor WC.
In a divided house near Powis Square, find which flats use the soil stack before moving a WC or arranging a water shut-off.
In a mansard bathroom, mark the standing headroom beside the bath and the position of the existing stack before moving the door.
In a Lower Richmond Road mansion flat, locate the shared stack and check how the new bathroom floor will insulate the flat below.
In a tall Richmond Hill terrace, follow the soil stack between floors before deciding where an upper-floor bathroom can go.
For an upper-floor bathroom in a Queen’s Gate mansion block, check the fall to the shared stack and who can isolate the water before moving the shower.
On Malcolm Road, plan the bathroom extract route around any surviving leaded casement window.
More bathroom renovation pages in West and South West London:
See what sets the bathroom renovation cost or use the cost calculator. Related work: house refurbishment, flat refurbishment, kitchen renovation and published case studies.
Surveying is a separate instruction to Hampstead Chartered Surveyors & Building Consultancy.
A bathroom packs drainage, waterproofing, ventilation and finishes into a small room. The decisions that matter are made before the old fittings come out.
A family bathroom has to hold a bath, a shower, a WC and a basin, with enough clear floor to use them. An en-suite is usually a shower, a wall-hung WC and a basin beside a bedroom. A cloakroom is a WC and a basin, often the first room a guest sees, and it is planned around the stack rather than around a style. The survey records the ceiling height, the joists and the soil stack before any of those layouts is promised.
A wall-hung WC and a wall-hung basin leave the floor clear, with the cistern and the waste inside the wall or a slim unit. In a very small room, a walk-in shower in place of a bath returns floor area, and a compact bath is the alternative where a bath has to stay. A door that swings into the room takes floor space a pocket door or a sliding door can give back, where the wall is deep enough. Larger tiles mean fewer grout joints, and a niche built into the shower wall replaces a hanging rack. A heated towel rail can take the place of a separate radiator where the heating design allows it. These are choices on the drawing, and each one changes the wall build-up.
A wet room is a floor that is tanked and drained, with no tray. The tanking runs across the whole floor, up the walls and around every pipe, and it is completed before the tiles. The floor falls to a linear drain along one wall, or to a central gully. A linear drain lets the tiles fall in one direction. A central gully needs the floor to fall from four sides. The gradient and the drain are set out in the screed or a former, not adjusted in the adhesive.
The floor has to be stiff enough that the tiles do not crack, which on an upper floor can mean checking the joists and boarding over them. Slip resistance is specified for the wet area. Polished stone is a poor choice underfoot once it is wet. A level threshold, reinforcement in the wall for a rail that may be wanted later, and a thermostatic valve are specified where the household needs them. They are drawn with the layout so the blocking and the valve are in place before the tiles.
A WC moves only as far as a fall to the soil stack allows. A shower or a bath moves only as far as its waste can fall. In an older house the stack may be cast iron, and adapting or replacing the section that is opened up is part of the survey, not a surprise in the strip-out. Extract has its own route, to an external wall or a duct the building allows, and it is fixed before the ceiling is closed.
A new bathroom, in a bedroom or a loft, needs a soil connection, a water supply and a floor that can carry the fittings. The waste is boxed in a chase where it cannot sit in the floor. In a flat the lease has to allow the connection, the hours and the route through the common parts. Listed-building consent is checked where the new openings or the loss of historic fabric would affect the building’s special interest.
Porcelain, natural stone, encaustic tiles and a micro-cement finish behave differently once they are wet and once they are cleaned. Natural stone is sealed before it is grouted and it is resealed as it wears. The quotation names the tile, the sanitaryware, the brassware, the tanking and who supplies each of them. It does not name a brand.
Inside the published range, the price moves with the room size, how far the plumbing moves, whether the floor is tanked as a wet room, the tile and sanitaryware specification, and the access. The 12-month aftercare/defects period applies to the completed work. If the household has to be out because this is the only bathroom, that stay is a household cost and it is not part of the build range.
Ventilation is sized for the room and given a route before the ceiling is closed. A fan that only recirculates does not deal with the moisture, and a duct with nowhere to go is found at the survey. The same drawing marks an access panel for the shower valve and the trap, so a later repair does not mean taking the tiles off. Where a rail may be wanted later, timber is fixed behind the tile now, in the positions on the drawing. The rail can wait. The wall cannot be opened again without disturbing the waterproofing.