Bathrooms by Hampstead Renovations

How we renovate a bathroom: 16-stage guide

What happens in your home at each stage—and what you need to decide before work reaches site—across a typical full bathroom refit, grouped into four chapters from first survey to handover.

Ross Alinari, Senior Building Surveyor and Construction Director. Hampstead Renovations Ltd, company number 16838595. £5M public liability, £10M employers' liability and contractors' all risks cover.

Updated

What happens in your home, and what is agreed first

This guide sets out the sixteen stages of a typical full bathroom refit in order, answering two practical questions at every step: what the site team does and checks, and what you as the homeowner need to decide or know.

Every room follows the sequence required by its structure, layout and chosen products. Some stages overlap on site—particularly first-fix plumbing and electrics, setting a shower tray or bath, installing electric underfloor heating where specified, and tiling. Where a home has more than one bathroom being refurbished, different rooms are often at different stages at the same time.

Confirmed scope vs typical options: Your written quotation and drawings confirm exactly what is included for your project—including retained items, contractor-supplied parts versus client-supplied finishes, and whether options such as a wet-room floor former, electric underfloor heating or bespoke glass apply. For cost factors and guide pricing, see what sets the cost on the Bathroom Renovation Hub.

Chapter 1 of 4 · Stages 1 to 3

Planning

Before old fittings come out, the survey, layout drawings, supply responsibilities, delivery dates, household access and shutdown arrangements are agreed in writing.

Stage 1 of 16 · Planning

Survey the existing bathroom

  • What the team doesMeasures door swings, window positions and sills, ceiling heights and usable floor space. Locates the soil stack, hot and cold water supplies and existing ventilation route, and measures the clearance needed around an open shower screen as well as the enclosure itself.
  • What we checkWhether the room dimensions, floor build-up, drainage connection and ventilation route can physically support the layout you want, and whether this is the only bathroom in the property so essential access needs are understood from the outset.
  • Decision: Can the proposed layout work with the building and the household?Tell us whether another WC and shower remain usable during the build and confirm which layout priorities matter most before design options are fixed.
Stage 2 of 16 · Planning

Agree the layout, scope and fittings

  • What the team doesDraws where the bath or shower, WC, basin, vanity, mirror, controls and storage will sit. Sets out in writing what is retained, what the homeowner supplies, what the written quotation includes, and the dates when concealed parts and finish selections are needed on site.
  • What we checkSelected products' installation drawings against the room: concealed shower valve depths, tap reach into the basin, vanity drawer clearances, and any property-specific permissions or building-management arrangements (such as a freeholder Licence to Alter or heritage consent).
  • Decision: Are the layout, supply responsibilities and critical delivery dates agreed?Confirm your exact sanitaryware, brassware and tile or stone thicknesses early—along with who supplies each item and when concealed boxes and finishes arrive—before strip-out begins.
Stage 3 of 16 · Planning

Protect the home and plan the shutdown

  • What the team doesAgrees site access, permitted working hours, waste removal logistics and water shutdown timing. Protects the full route from the property entrance to the bathroom, including stairs, hallways and communal areas in flats. Arranges the required asbestos information and surveys before disturbing existing fabric, and coordinates the relevant trades to isolate affected water and electrical services.
  • What we checkThat the necessary asbestos risk assessment and survey information is established before existing finishes are disturbed, communal-area protection meets building-management rules, and the relevant services are safely isolated ahead of strip-out.
  • What to know: Route, shutdown timing and household accessYou will know which entrance and route the team uses, when water or bathroom access is shut off, and how the household will manage washing and WC access while services are disconnected.

Chapter 2 of 4 · Stages 4 to 5

Opening up

Once services are isolated and access routes are protected, the old room is stripped back cleanly so the hidden structure, joists and pipework can be inspected before rebuilding.

Stage 4 of 16 · Opening up

Remove the old bathroom

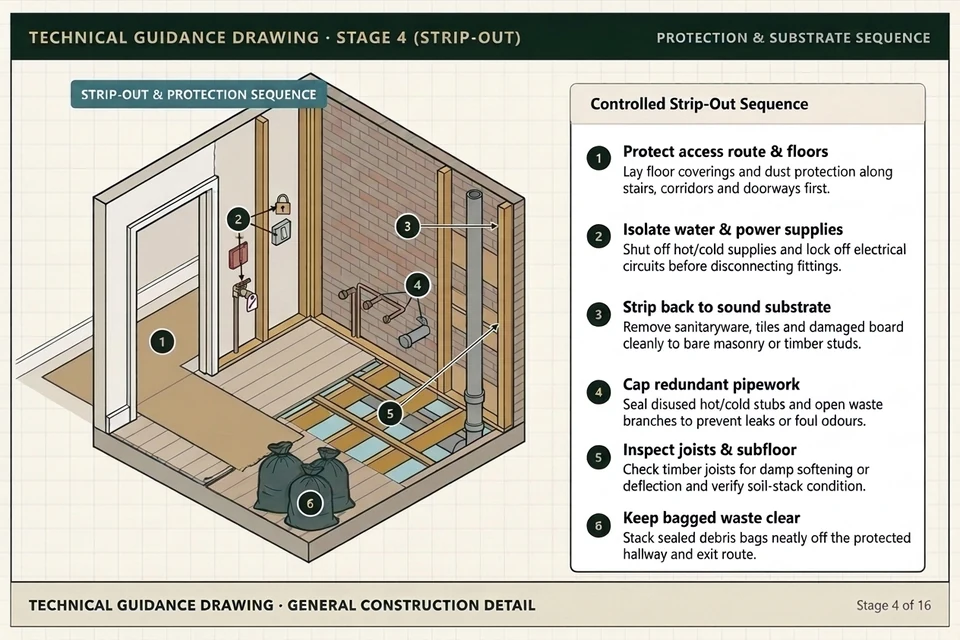
  • What the team doesOnce services are isolated, removes the agreed fittings, screens, vanity, wall and floor tiles, and worn finishes. Protects any items being reused and retains sound existing construction where the confirmed scope permits, keeping bagged waste clear of hallways and exit routes.
  • What we checkThe true condition of walls behind the tiles, the floor deck and joists around the old shower or bath, the existing soil-stack position and material (including cast iron in older houses and flats), and any disused pipe stubs or live cables before new chases are cut.
  • Decision: Does the exposed room match what the quotation allowed for?Opening up can reveal historic leaks, damp-softened boards or previous alterations hidden behind old tiles; any unexpected findings are reviewed with you before scope changes proceed.
Technical guidance drawing showing a controlled bathroom strip-out sequence with protected corridor floor coverings, isolated water and electrical supplies, walls stripped back to bare brick and timber studs, capped redundant pipework, exposed floor joists inspected, and bagged waste kept clear of the access route
General technical guidance drawing (not a photograph of a Hampstead Renovations project): general sequence for protecting access routes, isolating water and power supplies, stripping back to sound masonry or studs, capping redundant pipes, inspecting joists and keeping bagged waste clear of hallways.
Stage 5 of 16 · Opening up

Inspect and repair the structure and background

  • What the team doesInspects the exposed floor and wall construction, traces any damp or staining back to its root cause before covering the area, and carries out agreed repairs to subfloors, joists or wall backgrounds—referring structural issues to the appropriate professional where required.
  • What we checkSigns of leaks, movement, damaged floorboards, uneven levels, floor stiffness needed for tiling or stone, and joists weakened by earlier notches or holes.
  • Decision: Is the floor and wall construction suitable for the proposed build-up?Where a structural or substrate finding alters the confirmed scope, we explain the repair required, along with any cost and programme implications, for your agreement before moving on.

Chapter 3 of 4 · Stages 6 to 10

Before tiling

Every concealed pipe, cable, fan duct, structural support, tray or wet-room gradient and waterproofing layer is installed and checked while the walls and floor are still open—before the first tile is fixed.

Stage 6 of 16 · Before tiling

Install the concealed plumbing and drainage

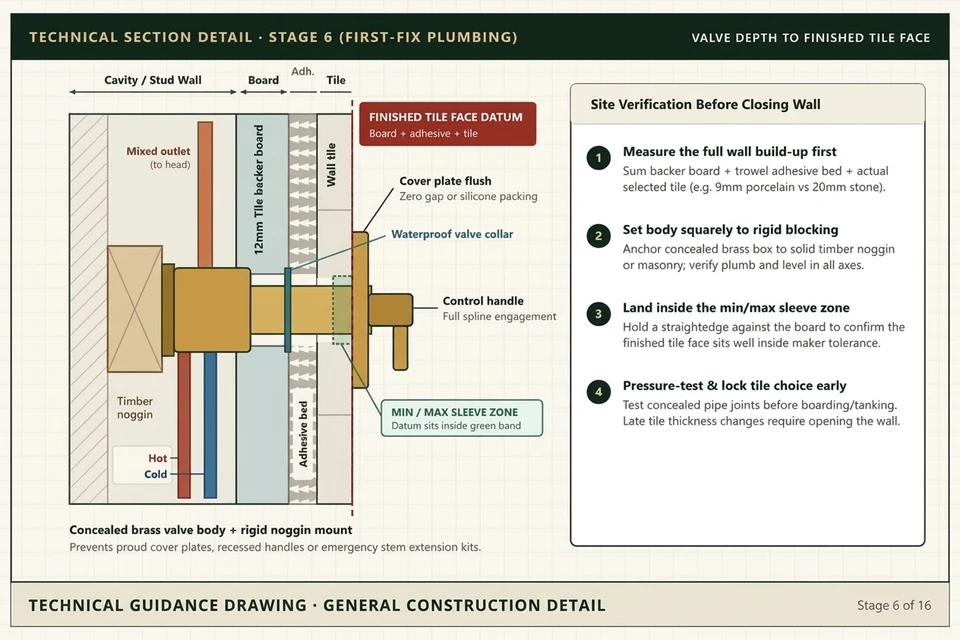
  • What the team doesPositions hot and cold supplies to the basin, WC, bath and shower; mounts concealed shower mixer bodies squarely to rigid timber noggins or masonry at the depth calculated for the finished tile face (backer board + adhesive bed + confirmed tile thickness); coordinates traps, waste falls and soil-stack connections; and sets out serviceable access for valves, cistern parts and traps.
  • What we checkWorkable waste gradients to the soil stack, plumb and level across the mixer box, straightedge verification that the finished tile datum sits inside the valve manufacturer's minimum and maximum sleeve band, and checking and testing concealed pipework and connections as appropriate before walls are closed.
  • What to know: Check valve and tap positions before the wall closesOutlet heights, tap positions and shower controls are still visible on the open wall and can be verified on site before boarding. Confirm final brassware and exact tile thickness (for example 9mm porcelain vs 20mm natural stone) before first fix ends.
Technical guidance section drawing showing a concealed shower valve body fixed to timber blocking and set so the cover plate sits flush against the finished tile face made up of backer board, adhesive bed and wall tile
General technical guidance drawing (not a photograph of a Hampstead Renovations project): section detail showing how the concealed valve min/max sleeve zone straddles the finished tile datum (board + adhesive + tile) so the cover plate sits flush against the tile face.
Stage 7 of 16 · Before tiling

Coordinate electrics, heating and extraction

  • What the team doesCoordinates the mirror supply, ceiling and task lighting, extractor fan, shaver socket and heating controls with the vanity and shower screen; resolves the fan duct route to a permitted external discharge point; and where electric underfloor heating is specified, coordinates sensor and thermostat positions now and installs and tests the floor heating at the stages required by its manufacturer.
  • What we checkThat the electrician selects suitable equipment and positions for the bathroom zones, the extractor duct follows a clear, permitted route (not venting into a void or relying on a recirculating unit), lighting avoids casting shadows at the mirror or clashing with screen doors, and underfloor heating resistance/continuity checks follow the manufacturer's required stages.
  • Decision: Will the lighting serve the person at the mirror, and does the fan have an appropriate discharge route?Confirm your mirror width, vanity position, light switching preferences, radiator or heated towel rail controls, and any external duct outlet approvals needed for a flat or conservation property.
Stage 8 of 16 · Before tiling

Build the walls, supports and service access

  • What the team doesForms new stud framing and adds solid timber or structural backing where the shower screen, basin, vanity unit, wall-hung WC frame or any future support rail will fix; frames recessed niches to align with the planned tile grid; fits the appropriate background or waterproof tile backer board for the wet-area system; installs any specified acoustic or fire protection to openings and penetrations; and retains access to serviceable parts.
  • What we checkWall-hung WC chassis rigidity and finished pan height, exact backing positions behind screens and wall-hung vanities, niche dimensions against full tile courses, backer board compatibility with the tanking system, and clear maintenance access to traps, isolation valves and cistern internals.
  • Decision: Can the fittings be securely fixed and the hidden parts maintained?Confirm recessed niche heights, wall-hung unit widths and whether extra blocking should go behind tiles now for future grab rails—once boarded and tanked, adding hidden backing requires opening the wall.
Stage 9 of 16 · Before tiling

Set the tray, wet-room floor or bath interface

  • What the team doesFor a wet room, prepares the structural build-up, trap and linear gully or floor former at the designed finished threshold height and pre-set gradient; for a shower tray or bath, levels and beds the tray or bath edge securely in the sequence required by the wall waterproofing system so the edge connects continuously into the tanking layer.
  • What we checkAvailable floor depth for the trap and waste fall, continuous water fall toward the outlet built into the former or screed (never improvised in tile adhesive), finished doorway threshold height, and exact coordination between tray/bath upstands and the waterproofing system instructions.
  • Decision: Can water reach the waste and can the waterproofing connect continuously to the selected outlet or edge?Confirm whether the room's floor depth allows a flush wet-room former or suits a low-profile shower tray, and verify how the chosen tray or bath edge meets the wall finish.
Stage 10 of 16 · Before tiling

Waterproof the wet areas

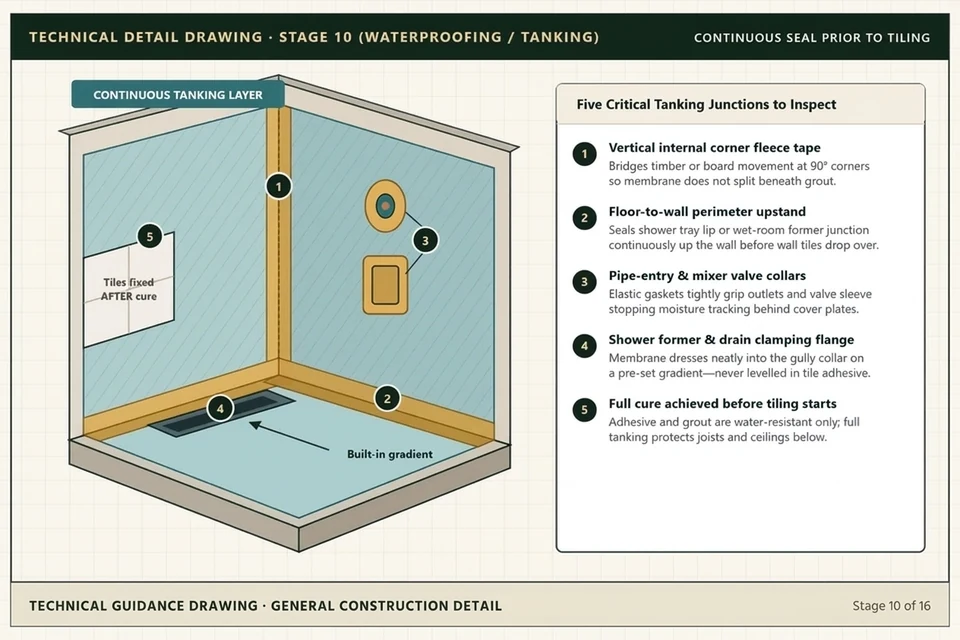
  • What the team doesInstalls the continuous "tanking" layer behind the tiles—essential because standard tile adhesive and grout are water-resistant rather than waterproof—detailing the junctions homeowners rarely see: wall-to-floor perimeters, internal 90-degree corners with reinforcing fleece tape, pipe-entry and mixer valve collars, recessed niches, and the drain clamping flange or tray/bath connection using compatible system components.
  • What we checkContinuous overlaps at internal corners and upstands, elastic collars tightly gripping concealed valve sleeves and pipe outlets, membrane dressed cleanly into the drain clamping flange or onto the tray/bath interface, zero pinholes or unsealed junctions, and completion of any job-specified checks and full curing time before tiling begins.
  • What to know: Final chance to inspect sealed junctions before tiling covers themOnce stone or porcelain goes on, every corner joint, pipe collar and tray seal is hidden from view. Tanking must never be rushed onto uncured coats—especially over an occupied flat or finished ceiling below.
Technical guidance isometric detail drawing of a shower corner before tiling showing continuous waterproofing tanking membrane, vertical reinforcing corner tape, tray perimeter upstand band, pipe-entry collars and drain clamping flange
General technical guidance drawing (not a photograph of a Hampstead Renovations project): detail drawing showing vertical internal corner fleece tape, floor-to-wall perimeter upstand, pipe-entry and mixer valve collars, shower former and drain clamping flange on a pre-set gradient, and full cure prior to tiling.

Chapter 4 of 4 · Stages 11 to 16

Fitting and handover

With concealed services tested and tanking cured, the visible finishes are set out, grouted and cured, followed by sanitaryware and glass fitting, lighting and fan commissioning, snag testing and handover.

Stage 11 of 16 · Fitting and handover

Set out and lay the tiles or stone

  • What the team doesMarks the tile setting-out lines around the vanity, concealed shower valve, recessed niche, window reveals, external corners and doorway threshold; shares prominent cuts, edge trim profiles or dry-laid stone veining before fixing; selects adhesive and notched bedding suited to the tile/stone, backer board and any electric underfloor heating; and preserves designed shower falls across the floor.
  • What we checkBalanced grout lines at key focal points, clean edge alignment at trims or mitres, solid adhesive coverage without voids under floor and wet-zone tiles, and consistent gradient toward the shower drain.
  • Decision: Are the most visible joints and cut edges in the agreed positions?Review the marked setting-out on the wall, confirm trim profile or mitred corner details, and sign off dry-laid natural stone veining before tiles are fixed permanently.
Stage 12 of 16 · Fitting and handover

Grout, seal and allow finishes to cure

  • What the team doesApplies the specified grout to tiled surfaces, forms flexible movement joints with sanitary sealant where surfaces meet (wall-to-wall corners, wall-to-floor perimeters and tray/bath edges), and seals natural stone where specified—following the tile, grout and stone supplier's guidance on curing, sealing, cleaning and earliest safe use.
  • What we checkUniform grout joints free of pinholes, flexible silicone rather than rigid grout along movement joints and tray perimeters (remembering that visible silicone complements the waterproof tanking layer behind it rather than replacing it), and full curing intervals before wet testing.
  • What to know: Earliest safe use and finish careYou will be told when the shower or bath can first be used while grout, silicone and stone sealers finish curing, and which pH-neutral or finish-safe cleaners to use without damaging grout, stone or plated brassware.
Stage 13 of 16 · Fitting and handover

Fit the sanitaryware, furniture and glass

  • What the team doesInstalls the WC, basin, taps and shower trim plates, vanity furniture, shower screen or enclosure and specified accessories in the required sequence; where bespoke glass is specified, coordinates template measurement once wall tiling is finished and manufactures/fits to exact finished dimensions.
  • What we checkTap projection and reach over the basin, flush valve cover plates seated cleanly against the tile face, comfortable clearances around the WC and basin, unobstructed vanity drawer travel, smooth shower screen swing and water-seal alignment, and working access to hidden cistern parts and traps.
  • Decision: Can someone use, clean and maintain everything as designed?Check vanity drawer opening, screen door swing and the exact positioning of towel rails, robe hooks and toilet-roll holders before final fixing through tiles.
Stage 14 of 16 · Fitting and handover

Complete lighting, ventilation and final finishes

  • What the team doesCoordinates the electrician to fit and test ceiling luminaires, illuminated mirrors, shaver points and fan/heating controls; completes ceiling decoration, mist/moisture-resistant paintwork, architraves, door easing and the doorway threshold; and follows the specified commissioning sequence where electric underfloor heating is fitted.
  • What we checkCorrect switching and dimming across lighting circuits, mirror lighting and demister operation, extractor fan operation and isolator/overrun settings, heating controls and gradual underfloor-heating commissioning sequence, and clean finishing at the room threshold.
  • What to know: Operating lighting, heating and extractionWe explain how the bathroom lighting switches, mirror controls, extractor fan overrun/isolation and towel-rail or underfloor-heating programmers operate—including any staged warm-up rules before running floor heating at normal temperature.
Stage 15 of 16 · Fitting and handover

Test the completed room and resolve snags

  • What the team doesRuns every tap, shower outlet and WC; checks supply performance, drainage flow and all accessible waste traps and connections for leaks; observes water flow across the finished shower floor or tray and tests the screen seal; checks extractor performance as applicable; logs and puts right snag items; and ensures the responsible trades complete the inspections or certificates appropriate to the work.
  • What we checkZero weeping at traps, cistern feeds and accessible joints under flow, positive drainage across tiled shower floors without standing water outside falls, watertight screen seals, ventilation draw, and completion of applicable inspections or trade certificates.
  • Decision: Which checks have been completed, and is there anything still to resolve?Walk the finished bathroom with the team to confirm completed checks and ensure any remaining snag items are written down with agreed resolution steps.
Stage 16 of 16 · Fitting and handover

Clean, demonstrate and hand over

  • What the team doesDeep-cleans the completed room; demonstrates where water isolation valves sit, how to reach traps or concealed cistern internals, and where product manuals and warranties live; explains care for plated brassware, grout, silicone and natural stone where fitted; hands over agreed records, relevant certificates and aftercare contacts; and records any residual items with agreed dates.
  • What we checkThat the homeowner can locate isolation valves and access panels confidently, all agreed documentation and applicable certificates are assembled, routine care instructions match the installed finishes, and any outstanding snag items have clear dates.
  • What to know: Records, care and aftercare contactYou leave handover knowing what documents and certificates belong to your project, what routine care keeps stone, grout and seals performing, and who to contact during the 12-month aftercare/defects period.

What changes for a flat, an only bathroom or several bathrooms

The sixteen construction checkpoints stay the same, but property type and household access change how logistics, approvals and sequencing are planned in Chapters 1 and 2.

In a flat

  • Approvals & building rules: Moving drainage, altering wet zones or changing extract outlets often needs freeholder or managing-agent consent (a Licence to Alter) before work starts.
  • Common parts & hours: Lift and communal hallway protection, bagged waste collection and permitted noisy-work windows are agreed with building management at Stage 3.
  • Stacks & flats below: Shared soil stacks, communal vs private stopcocks, acoustic floor build-up and uninterrupted wet-zone tanking are confirmed early because water escapes affect the home beneath.

When it is the only bathroom

  • Planned shutdown dates: The exact days without a working WC or shower are agreed before strip-out starts rather than improvised mid-build.
  • Living arrangements: Households decide in advance whether to stay with temporary washing/WC arrangements or arrange time away during plumbing disconnection, tanking cure and tiling.
  • Daily clean-down: Corridor protection and end-of-day tidy-ups keep the rest of the home liveable when occupants stay on site (any external accommodation sits outside the build quotation).

With several bathrooms

  • Phased sequence: Rooms are commonly sequenced one after another—or staggered—so at least one WC and shower stay working while another bathroom is stripped out.
  • Overlapping stages: Different bathrooms in the same house frequently sit at different stages at once (for instance first fix in an en-suite while tiling cures in the family bathroom).
  • Hot-water capacity: When adding en-suites or specifying rooms that run simultaneously, supply pipe sizing and hot-water demand are checked at Stage 1 and Stage 6.

Plan your bathroom renovation

Book a feasibility visit so we can survey the room, trace the soil stack and extract route, and confirm what your floor build-up allows—or return to the Bathroom Renovation Hub for published London projects, cost inclusions and local area guides.

Ross Alinari, Senior Building Surveyor and Construction Director · Hampstead Renovations Ltd, Company No. 16838595 · £5M public liability, £10M employers' liability and contractors' all risks cover · 020 7101 3168

Chat with us!